Troubleshooting
Category: Troubleshooting, Version 5.x, Version 6.x
The item was most likely deleted manually in Outlook on one of the PCs by mistake. SimpleSYN then automatically synchronized this deletion to the other devices.
Important to know:
SimpleSYN can only synchronize a deletion if an actual action has taken place beforehand – such as a manual deletion, a move, or removal by another program or add-in.
By default, SimpleSYN automatically creates a backup whenever an item is deleted.This allows you to recover accidentally deleted items or folders.
How to find the backup:
On the PC where the deletion was synchronized, open Outlook and go to:
SimpleSYN toolbar > Restore deleted items
There, you can easily restore the deleted items or folders.
Additional notes on how SimpleSYN works:
SimpleSYN operates on a per-folder basis.
So if you move an item from one synchronized folder to another, SimpleSYN treats this as a "deletion" in the original folder. In this case, a backup is also created – even though the item was only moved, not deleted.
Other possible causes for deleted items in Outlook include:
- Other synchronization tools
- Exchange Server or other server-based services
- Auto-archiving
- Outlook rules or QuickSteps
Category: Troubleshooting, Version 2.x / 3.x
Please restart both devices (Windows PC and smartphone) first.
Note: An active internet connection is required for synchronization. All participating devices must be turned on at the same time for synchronization.
Then check the following points:
Type of Synchronization
The data on the mobile device can either be:
- synchronized manually, or
- automatically synchronized via push.
Important:
Push synchronization occurs immediately only for new entries. Changes or deletions may be synchronized with a delay of up to 15 minutes. The automatic update interval depends on the device's manufacturer and system.
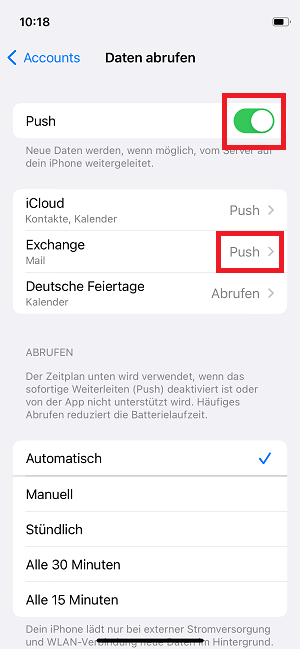
Check whether you have enabled push for the SimpleSYN Mobile account on your device.
Enable Push Synchronization on iOS
- Open settings of your Apple iOS device.
- iOS version 12 and 13: Tap “Passwords & Accounts”
iOS / iPadOS version 14, 15, 16 and 17: Tap “Mail”, “Contacts”, “Calendar”, or “Notes” and then tap “Accounts”.
iOS / iPadOS version 18, 26: Open Apps, Tap „Mail“, „Contacts“, „Calendar“ or „Notes“ and then tap “Accounts”. - Tap “Fetch new Data” at the bottom.
- Enable Push if it is not already activated.
- Make sure that Push is selected for the SimpleSYN Mobile Exchange account (not 'Fetch' or 'Manual')."
Manual Data Synchronization on iOS:
Alternatively, you can manually trigger the synchronization of individual data items. On Apple iOS, for example, you can initiate a manual sync using the “pull down” gesture within the respective app (e.g., Calendar).
Example:
If you want to manually sync the calendar on iOS, first open the Calendar app. Then switch to the list view and perform the pull-down gesture. A spinning sync icon will appear, indicating that the synchronization process has started.
How to enable push on Android
The names of the menu items may differ slightly depending on the Android version and manufacturer.
- Open the settings of your Android device.
- Tap “Accounts and Backup”.
- Tap “Manage Accounts”.
- Under "Manage Accounts," tap your created SimpleSYN Mobile Exchange account (@simplesyn.app).
- Tap “Account settings”.
- Tap your created SimpleSYN Mobile Exchange account again.
- Tap “Sync frequency”.
- In “Sync frequency” select “Automatic (Push)”.
Manual data synchronization on Android:
On Android, manual data synchronization can be done in the menu of the respective app by tapping "Refresh", or by the “Pull Down” gesture.
Category: Troubleshooting, Version 2.x / 3.x
You have probably installed the new major version 3. The version number is displayed in the user interface under “Information.” If you have installed version 3 but prefer to stay with version 2, please follow these steps:
- Uninstall Version 3:
Go to Windows > Settings > Apps > Installed Apps, find SimpleSYN Mobile Version 3 in the list of installed programs, and uninstall it. - Reinstall Version 2:
Download and install the previous version 2 from the following link:
https://www.simplesyn.net/Media/Default/Downloads/Mobile/2.8.13611/SimpleSYN_Mobile.exe
After that, everything should work as usual again.
Note:
With a lifetime license, there are no additional monthly/annual costs. The license entitles you to unlimited use of the licensed version (e.g., version 2.0). Minor updates (e.g., version 2.0 to version 2.0.1, etc.) are free. Upgrades to new major versions (e.g., version 2.x to version 3) are subject to a fee, but are of course optional. Subscription licenses include both minor updates and upgrades to new major versions.
With a lifetime license, new major versions are not installed automatically. Instead, they are displayed in the user interface under "Information." This is how we inform customers with a lifetime license that a new major version is available. Lifetime license customers have the opportunity to test the new major version and can manually initiate the download from the user interface.
If you prefer to stay with version 2, you can hide the upgrade notification:
Open the update dialog and click “Do not show this upgrade again” to stop receiving further notifications about version 3.
Category: Installation, Troubleshooting, Version 5.x
Please check which major version of SimpleSYN Standard/Business you originally purchased.
If you purchased an older major version (e.g., version 5 or version 4), you probably have the current major version 6 installed. You can view the version number in the main window under "Information".
If this is the case:
Unfortunately, the old licenses are no longer valid for new major versions, hence the message.
Please note: Licenses are offered as a one time payment. There are no additional costs per month/year. The license entitles you to use the licensed version (e.g. version 5.0). Minor updates within this version (eg version 5.0 to version 5.0.1 etc.) are included. Upgrading to a new major version (eg version 5.x to version 6) are subject to a fee, but optional.
If you wish to stay with your current version, first uninstall version 6. Then reinstall the major version you purchased.
You can download older major versions from the following page:
https://www.simplesyn.net/en-US/additional-downloads
After installation, your old license file will be accepted again.
Interested in version 6?
If you would like to upgrade to version 6, you will receive a 20% discount on the same number of licenses.
Simply send us an email to support@simplesyn.net with your order number and the purchase date.
Category: Troubleshooting, Version 2.x / 3.x
With a lifetime license, new major versions are not installed automatically. Instead, they are displayed in the user interface under "Information." This is how we inform customers with a lifetime license that a new major version is available. Lifetime license customers have the opportunity to test the new major version and can manually initiate the download from the user interface.
Would you like to stay with version 2?
Please first uninstall version 3 via Windows > Settings > Apps > Installed Apps.
Afterwards, you can download and reinstall version 2 from the following page:
https://www.simplesyn.net/Media/Default/Downloads/Mobile/2.8.13611/SimpleSYN_Mobile.exe
After that, everything should work as usual again.
If you want to stay with version 2, you can also deactivate the upgrade notice as follows:
Simply click “Do not show this upgrade again” in the update dialog to stop receiving further upgrade notifications.
Some more information about the licenses:
With a lifetime license, there are no additional monthly/annual costs. The license entitles you to unlimited use of the licensed version (e.g., version 2.0). Minor updates (e.g., version 2.0 to version 2.0.1, etc.) are free. Upgrades to new major versions (e.g., version 2.x to version 3) are subject to a fee, but are of course optional. Subscription licenses include both minor updates and upgrades to new major versions.
Category: Troubleshooting, Version 2.x / 3.x
Restart the Windows PC (do not click “Shut down” and then turn the PC back on, but click “Restart”).
If the behavior occurs again, please send us the log files.
SimpleSYN Mobile includes a built-in function for sending feedback and diagnostic data.
- Click on "Information" in the main window and click on "Feedback".
- In the next dialog, you can describe your problem and submit your message. The "Include diagnostic data" checkbox shouldbe checked so that we can analyze the problem in detail.
Category: Troubleshooting, Version 2.x / 3.x
In the SimpleSYN Mobile application on the Windows PC, under “Options > advanced options”, change the value for the “http port”, e.g. instead of “9238” > “9240”.

Then click on the link “Click here to update Windows configuration” to adjust the changed configuration.

Restart SimpleSYN Mobile and create the SimpleSYN Mobile account on the smartphone again.
Category: Operation, Troubleshooting, SimpleSYN Mobile, Version 2.x / 3.x
The earliest date that the Google Calendar app can display is January 1, 1970. The appointments were synchronized correctly, but cannot be displayed in the app.
For birthdays, we recommend storing them in contacts. Older appointments can also be added there and the calendar app displays them correctly.
Category: Troubleshooting, Version 5.x, Version 6.x
The behavior can occur if Outlook was installed in a different bit version than the previous version during the new installation. In this case, the bit versions of Outlook and SimpleSYN no longer match and SimpleSYN can no longer be started.
Uninstall SimpleSYN under the Windows control panel (or under "Apps") and then reinstall SimpleSYN.
If the behavior occurs again afterwards, then install SimpleSYN in the correct bit version as follows:
- First find out in which bit version (32 bit or 64 bit) Outlook was installed after the reinstallation.
To do this, open Outlook and click on "File > Office Account > About Outlook". You can see the bit version behind the version number. - Uninstall SimpleSYN from “Windows > Settings > Apps > Installed Apps”.
- Then download SimpleSYN and navigate to the directory where the "SimpleSYN.exe" file (for the standard version) or "SimpleSYN_Business.exe" file (for the business version) is located (e.g. on the desktop or in the download folder) .
- In this directory, press and hold the „shift" key on the keyboard and right click in a free area and select " Open PowerShell window here " from the context menu.
-
After that, the Windows PowerShell window will open.
Now type in the following command and press the ENTER key.
Note: Pay attention to the correct spelling. There is no space at the beginning of the command between ".\".
With the standard version:
When you have installed Outlook in 32-Bit, use the following command:
.\SimpleSYN.exe Platform=x86When you have installed Outlook in 64-Bit, use the following command:
.\SimpleSYN.exe Platform=x64With the business version:
When you have installed Outlook in 32-Bit, use the following command:
.\SimpleSYN_business.exe Platform=x86When you have installed Outlook in 64-Bit, use the following command:
.\SimpleSYN_business.exe Platform=x64 - You can then install SimpleSYN. After the installation, SimpleSYN is started correctly again.
Category: Troubleshooting, SimpleSYN Mobile, Version 2.x / 3.x
If you set up the SimpleSYN Mobile account on the mobile device and made a mistake when entering the e-mail address or the password, there will be no error message with the old Android versions, but the settings are incomplete and synchronization cannot take place.
Make sure that "Server" displays a longer string of numbers and letters, followed by ".simplesyn.app".
If only"simplesyn.app" is displayed in "Server", you probably have typed in a wrong email address or password. In this case, tap the back arrow and check the email address and password details.
Category: Troubleshooting, SimpleSYN Mobile, Version 2.x / 3.x
If you want to make a backup of your Outlook data files, disable the synchronization of SimpleSYN Mobile and close the main window. SimpleSYN Mobile then no longer accesses the data files. After the backup, you can re-enable synchronization.
To deactivate the synchronization, right-click on the SimpleSYN Mobile icon in the notification area and select "Disable synchronization" from the context menu.
Category: Installation, Troubleshooting, Version 6.x
This message indicates that SimpleSYN cannot be installed on your computer because you are probably using an ARM processor.
SimpleSYN is only compatible with Windows 11 or 10 on computers with classic x86 or x64 processor architectures (Intel or AMD). Installation on ARM-based systems is not supported.
Category: Troubleshooting, Version 5.x, Version 6.x
Please make a Outlook repair installation on this computer. Please follow this instruction:
https://support.office.com/en-us/Article/Repair-an-Office-application-7821d4b6-7c1d-4205-aa0e-a6b40c5bb88b
Important:
Choose a full online Outlook repair installation and NOT a quick repair.
Category: Troubleshooting, Version 5.x, Version 6.x
If SimpleSYN (Standard or Business) suddenly doesn’t start and the icon is no longer visible in the Windows taskbar, this is usually caused by an issue accessing the “SimpleSYN.config” file.
Here’s how to fix it step by step:
-
Close Outlook if it’s currently running.
-
Open Windows Explorer and navigate to the following folder, depending on your SimpleSYN version:
- Version 4:
C:\Users\[Your Username]\AppData\Local\SimpleSYN\4.0.0.0 - Version 5:
C:\Users\[Your Username]\AppData\Local\SimpleSYN\5.0.0.0 - Version 6:
C:\Users\[Your Username]\AppData\Local\SimpleSYN\6.0.0.0
- Version 4:
-
Locate the file named “SimpleSYN.config” in that folder.
-
Delete this file.
-
Restart SimpleSYN. The file will be automatically recreated.
After restarting, SimpleSYN should work normally again. You’ll just need to reactivate it once using your license file.
Don’t have your license file anymore?
No worries – simply contact the SimpleSYN Support Team to retrieve your license.
Category: Troubleshooting, Version 5.x, Version 6.x
Here's what to do if the folder list in the synchronization settings remains empty and no folders are displayed:
- Completely close Outlook and SimpleSYN on the affected PC.
- Then restart both programs.
If the issue persists, please check the following points:
- Set the correct Outlook version:
- Open SimpleSYN.
- Go to “Options” > “Advanced Options”.
- Under “Outlook Version”, select the version you actually have installed (e.g., Outlook 2021 or Outlook 2016).
- Save the settings and restart SimpleSYN.
- Check permissions:
- Make sure that both Outlook and SimpleSYN are started without administrator rights.
- Verify the Outlook profile:
- In SimpleSYN, open the main menu > Options.
- Ensure that the same Outlook profile is used as when starting Outlook.
Category: Troubleshooting, Version 5.x, Version 6.x
The message "destination folder was not found" appears if the top folder level in Outlook (eg "Personal folders") has been named differently on the SimpleSYN client and SimpleSYN server. In this case, SimpleSYN can not assign the destination folders automatically because no new PST files are created by SimpleSYN.
Click on the "Select a different target folder" link and select the folder where you want to sync.
Alternatively, you can name the highest folder level identically on all computers in advance.
Category: Troubleshooting, Version 5.x, Version 6.x
If you have made changes to the Outlook default color categories, you must ensure that the color category list (formerly the "Main Category List") is manually configured identically on all PCs. SimpleSYN does not automatically synchronize this list. The categories assigned to the items are retained and correctly synchronized by SimpleSYN.
Starting with version 6, the "Add new categories to the main category list" function is available.
If this option is enabled, SimpleSYN checks during synchronization whether all categories used in the items are also present in the main category list. If a category is missing, it is automatically added to the list with a default color. You can then manually adjust the color to ensure a consistent display across all devices.
Category: Troubleshooting, Version 5.x, Version 6.x
IMAP accounts store your emails directly on your email provider's server. This means your emails are automatically synchronized across all your devices.
Important:
Since IMAP already automatically synchronizes email folders (such as Inbox, Sent Items), additional synchronization of these folders with SimpleSYN is not possible. This would lead to conflicts. Therefore, SimpleSYN does not display these email folders in the "Synchronization Settings" on the client.
Even though email folders cannot be synchronized with IMAP, other local Outlook data such as:
- Calendar
- Contacts
- Tasks
- Notes
can be easily synchronized with SimpleSYN.
If you also want your email folders to be synchronized via SimpleSYN, you should use a POP3 account on all PCs instead.
Category: Troubleshooting, Version 5.x, Version 6.x
If you receive this message, please follow these steps:
Check the Outlook version in SimpleSYN:
- Open the SimpleSYN main menu on this PC.
- Go to “Options” > “Advanced Options”.
- Under “Outlook Version”, select the version you actually have installed (e.g., Outlook 2024).
- Save the settings and restart SimpleSYN.
Reinstall SimpleSYN:
- If the issue persists, uninstall SimpleSYN:
- Open “Windows > Settings > Apps > Installed Apps”.
- Find SimpleSYN in the list and uninstall it.
- Then reinstall SimpleSYN.
Repair your Office installation:
- If the problem still occurs after reinstalling SimpleSYN, repair your Office installation:
- Again, go to “Windows > Settings > Apps > Installed Apps”.
- Find Microsoft Office, click “Modify”, and choose the “Online Repair” option (do not select quick repair).
- Follow the on-screen instructions.
Category: Troubleshooting, Version 5.x, Version 6.x
Duplicate e-mails can occur on an POP3 account, when e-mails from more than one computer being synchronized are requested from the e-mail server. This is the case if the Outlook function “Leave copy of messages on the server” was activated in a POP3 E-mail account.
The tricky here is that SimpleSYN cannot force Outlook to stop downloading an email a second time on another computer. If the first computer downloads the mail from the email server and it gets synchronized before the second computer downloads it, Outlook cannot detect that the email is already there. The second computer will than download the email from the email server and you got a duplicate. As the first email is also already synchronized, SimpleSYN assumes that the second download is intentional and synchronizes this copy too.
In this case deactivate the Outlook function “Leave copy of messages on the server” so as not to save e-mails in your mail server and download them repeatedly.
To deactivate this function follow these steps:
- Open Outlook
- Open the Backstage area by clicking on “File“
- In the category “Information” click on “Account Settings” and “Add or Remove Accounts…”
- Highlight the POP3 E-mail account in question and click on “Change“
- Click on “More Settings“
- In the tab “Advanced” deactivate the check box “Leave copy of messages on the server“
- Confirm the changes by clicking “OK“
- Click on “Next“ and then on “Finish“
If you are using a current version of Outlook:
- Open Outlook
- Open the Backstage area by clicking "File"
- In the "Information" category, click "Account Settings" and then "Add or Remove Accounts..."
- Select the affected POP3 email account and click "Change"
- In the next dialog, uncheck the "Leave a copy of all messages on the server" checkbox
- Confirm the changes by clicking "Next"
Category: Troubleshooting, Version 5.x, Version 6.x
If SimpleSYN cannot establish a connection, please note the following:
- Installation and execution
Make sure SimpleSYN is installed and running on both the client and server computers. - Correct configuration
One computer must be configured as the SimpleSYN server, and the other PCs as SimpleSYN clients. - Use the same major version
All computers must be using the same major version of SimpleSYN (e.g., version 6.x). Different major versions (e.g., 5.x and 6.x) are incompatible. You can find the version number in the main window under "Information." - Internet connection
All computers must be connected to the Internet. - Check the date and time
Check that the Windows time, time zone, and date are set the same on all computers.
If these requirements are met, check the "Status" message on the client.
If the client displays "not connected":
- Open SimpleSYN on the server and go to "Options" to display the server ID.
- Open SimpleSYN on the client and go to "Options > Connect to a different server."
- Enter the server ID there.
- Save the settings.
If the client displays "Authentication failed":
- Open SimpleSYN on the server.
- Go to "Synchronization Settings > Manage Users."
- Select "All Users", assign a new password, and save the page.
- Open SimpleSYN on the client.
- Go to "Options" and make sure:
- "Default" is selected for "Login."
- In the "Password" field, enter the new password you assigned on the server.
- Save the settings.
Category: Troubleshooting, Version 5.x, Version 6.x
How to activate the Outlook add-in in SimpleSYN:
- Open the SimpleSYN main window on your PC.
- Go to “Options” and then to “Advanced Options.”
- Check the box for “Enable Outlook Add-In.”
- Save the settings.
- Then restart SimpleSYN.
Additional note:
Open Outlook and go to “File” > “Slow and deactivated COM Add-Ins.”
Check if the SimpleSYN add-in has been disabled there. If so, please re-enable it.