Synchronization settings
Applies to version: Version 6.x
In this area it is possible to configure in detail the method of synchronization. The options under “Synchronization settings” are differing depending on whether SimpleSYN has been configured as a SimpleSYN-server or a SimpleSYN-client.
The computer has been configured as a SimpleSYN-client
If SimpleSYN is configured as a SimpleSYN-client the synchronization settings show the configuration of the automatic synchronization.
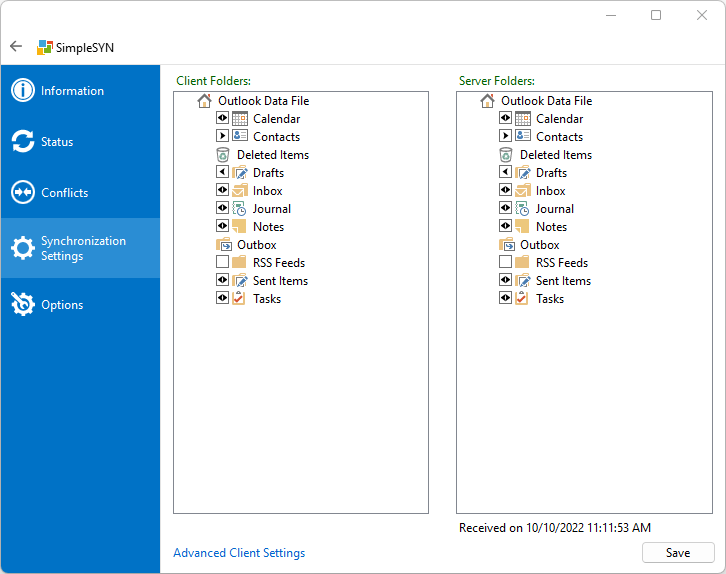
On the left hand side is the folder structure of the client computer, on the right hand side the structure of the SimpleSYN-server. Check all Outlook® folders that are supposed to be synchronized automatically.
Selection of the Outlook® folders for automatic synchronization
 Image 1: synchronization settings
Selection of an Outlook® folder either on the client or the server side leads to automatic marking of the currently selected or automatically attributed target folder on the according other folder list. In this way it is always possible to see which folders are being synchronized with each other.
Click on the checkbox in front of the desired Outlook® folder on the client or the server side to select the Outlook® folder for automatic synchronization. The arrows inside the checkbox designate the synchronization direction. Click several times on the checkbox to select the synchronization direction.
| The Outlook® folder is synchronized in both directions from the SimpleSYN-client towards the SimpleSYN-server and from the SimpleSYN-server towards the SimpleSYN-client. | |
| The Outlook® folder is only synchronized from the SimpleSYN-client towards the SimpleSYN-server. | |
| The Outlook® folder is only synchronized from the SimpleSYN-server towards the SimpleSYN-client. |
If a folder is selected on the client or server side that does not exist on the opposite side this folder will be automatically created by SimpleSYN and shown with a “plus” symbol until the first synchronization. New folders can only be created automatically if SimpleSYN allows this.
Subfolders of a checked Outlook® folder will be synchronized with the same synchronization direction and settings. Changes to the subfolder hierarchy will also be synchronized by default (new, renamed and deleted subfolders).
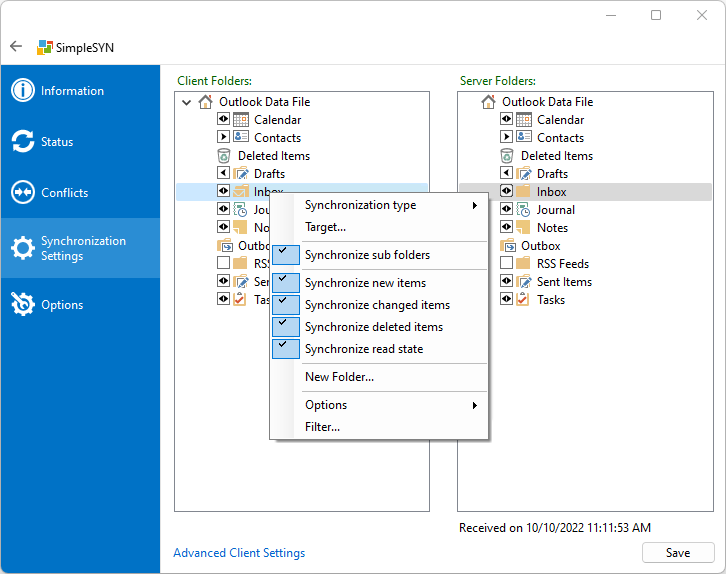
If you do not want to synchronize all subfolders, right click on the folder to open a context menu. Disable the menu item “Synchronize subfolders”.
Context menu
Right click an Outlook® folder to obtain more configuration possibilities. The context menu allows detailed specifications which method of synchronization to use.
 Image 2: shortcut menu
Synchronization type
Here it is possible to indicate the synchronization direction. The synchronization direction is also being shown through arrows in the checkbox in front of the according folder.
Target…
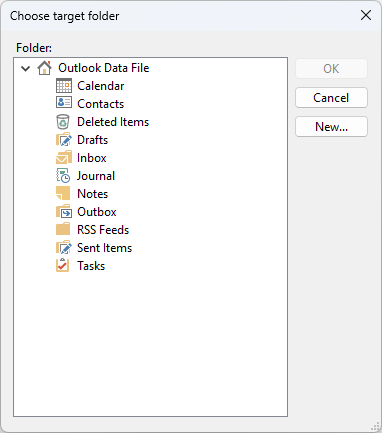
Lets you manually select the target folder for the synchronization. Select the target folder for synchronization in the following dialog.
 Image 3: select target folder
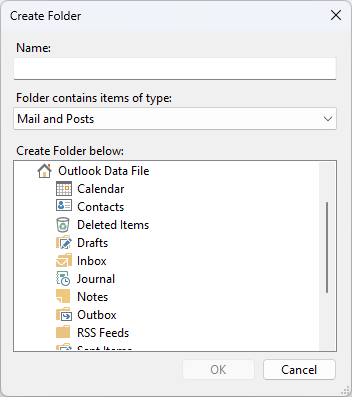
Click on “New…” to create a new Outlook® folder on the target computer
 Image 4: create new folder
Synchronize subfolders
If activated, subfolders will be automatically created, renamed and deleted. The subfolders will be synchronized with the same synchronization direction and settings as the configured parent folder.
Synchronize new items
If activated every new item in this folder is synchronized.
Synchronize changed items
If activated every modified item in this folder is synchronized.
Synchronize deleted item
If activated deleted items are also deleted in the target folder.
Synchronizing read state
If activated the read status of an item is synchronized.
New folder…
Here it is possible to create new folders.
Options
- Reminders
- Don`t synchronize
If enabled, any changes made to reminders from the other side will not be applied. I.e. reminders are not created, changed or closed. Reminders will not be added to new items. - Don`t close or snooze
If enabled, closing a reminder or snoozing it again will not apply. This means that reminders are taken over from the other side, i.e. created or changed, but only closed locally.
- Don`t synchronize
- Read state
- Set new items to read
When enabled, new items are always marked as read. This means that new elements are synchronized and the read status is automatically marked as read locally. - Set new items to unread
When enabled, new items are always marked as unread. This means that new elements are synchronized and the reading status is automatically marked locally as unread. - Set updated items to read
When enabled, updated items are always marked as read. This means that for elements that already exist and have been updated, the read status is automatically marked as read locally. - Set updated items to unread
When enabled, updated items are always marked as unread. This means that for elements that already exist and have been updated, the read status is automatically marked locally as unread.
- Set new items to read
- Categories
- Don`t synchronize
If enabled, categories from other sites will not be synced. I.e. categories for an element are not created or changed. Categories are not added to new items.
- Don`t synchronize
Refresh
Reloads the folder list. Click on “Refresh” to adopt newly created or deleted folders. The click on “Refresh” on the server side of the folder list initializes the exchange of folder information. For this a SimpleSYN-server needs to available.
Filter…
Click on “Filter…” to filter the synchronization of the folder. In this way it is possible to exclude private items from the synchronization. More information about the filters can be found here.
The computer has been configured as a SimpleSYN-server
If SimpleSYN is configured as a SimpleSYN-server more information about the synchronization settings can be found in the chapter “Set available Outlook® folders” here.
 All modifications will only be adopted after a click on “Save”. Click on “Back” or leave the options through another menu point to discard made modifications to the settings.
 Modifications in the marked Outlook® folders are being monitored by SimpleSYN and automatically synchronized.
 Should only the note “No folder information is currently available” be shown, follow the instructions for problem solving